Text-Only Instructions
Credits and Resources:
This model is based on a decorative serviette or napkin I saw folded in a Ratisson Blue Hotel in February 2015.
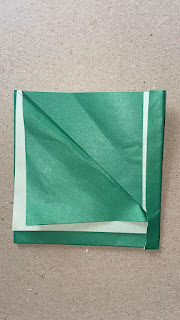
I loved the sloping lines of the model and the front of this card shows off the same slanting, diagonal lines.
Paper to be used: Square, any size; a sq
uare made from construction, copy or printer paper will work well for this model.
Folding level: Easy/Beginner
Steps: 7
Description: The finished model is a decorative card with diagonal lines, sloping from top left to bottom right on the front.
This card looks great if folded from two-sided paper. For instance, if one side of the paper you start off with is white and the other side pink, the finished model will have an attractive design of different areas of white and pink on the front.
Remarks:
This pocket card can be used in scrap books, on top of gifts, for enclosing cards, notes, money, any small, flat object.
The model is quite secure as long as you do not fill it with things that are heavy or bulky.
Alternatively, a piece of paper can simply be folded into this model and decorated for a quick children's project or a personal touch.
If using two-sided paper, lay your paper with the patterned or colored side down before starting to fold.
Step 1
Place a square piece of paper down on a hard, flat surface with its edges to the left and right, top and bottom.
Step 2
Fold the top edge down to meet the bottom edge to form a rectangle.
Crease and leave folded.
Step 3
Fold the right edge of the rectangle over towards the left, but stop about a centimeter from the left edge.
Crease well along the right side of the model and leave folded.
Notice that you have 4 separate layers of paper along the left side of your model. Two layers at the left edge and another two layers a centimeter or so to the right of this edge.
Step 4
Next, fold the bottom left corner (top layer only) up so the fold lines up with the right edge of the model.
Crease well and leave folded.
Step 5
Repeat this same fold with the second layer of paper, but do not fold it all the way to the right edge. Stop about a centimeter from the right side so that the first layer is still visible.
You are creating these last two folds to form layers or pleats. They should lie diagonally from top left to bottom right.
Step 6
Now, fold over the entire left edge of your paper as far as it will go towards the right to form a narrow band along the left edge of your card.
Step 7
Slightly open the last fold you have made. Tuck in the folds that have formed at the top left corner of the model into this pocket
Press flat to complete your sloping serviette card.
Making origami accessible to visually impaired crafters through text instructions.
for non-commercial use only.
Compiled by Lindy van der Merwe, July 2015
Revised, January 2023


Could you include a photo of this model? My completed model does not seem to have sweeping diagonals. Thank you.
ReplyDeleteHello there. Thanks so much for your question. I have folded the card and will upload a photo for you asap. I hope it will be helpful. 😊
ReplyDelete